A Virtual Private Network (VPN) allows a remote machine through an encrypted connection to connect to a local area network as if it was a local machine. It’s useful when traveling and you need access to a computer on a lan behind a firewall for whatever reason. Typically you’d use this to securely access your work network from the outside, but you can create the same functionality on your home network. It’s also useful when away on a connection which is blocking ports, blocking websites, or monitoring your traffic. You can connect to your home VPN through a single encrypted port and use the internet as if you were in the privacy of your own home.
There are several protocols for making a VPN. Here is a good overview of PPTP, IPSEC and OpenVPN. I chose OpenVPN because it can run on any port, and seems to be the most recommended. I configured my server to run on port 443, the same port as HTTPS. This makes fairly sure you can always access your home VPN from any other network as they most likely will not restrict HTTPS access. Warning though, OpenVPN is probably the most difficult to set up out of all the options.
EdgeRouter and OpenVPN
Here I talk about the EdgeRouter Lite
Steps for turning EdgeRouter into a DHCP Router
Even though the EdgeRouter has the capability to run OpenVPN server, its completely absent from the web config. Most of it has to be done through the command line. It was also difficult to find good guides on how to set it up, there are many steps and concepts which can be confusing. Searching for OpenVPN on Vyos or Vyatta helped to find additional resources.
OpenVPN Concepts
- There are servers and there are clients, we want our router to act as an OpenVPN server and any remote computers to have client access. Technically though clients can be servers and vice versa, but we won’t get into that.
- OpenVPN can run in several modes to authenticate clients and servers, making a confusing process even more difficult. Wikipedia has a concise summary of the available methods. We will be configuring the Public Key Infrastructure based solution, which also happens to be the most complex option.
- We will be using OpenSSL encryption tools for public/private key and certificate generation. Public key encryption details are beyond this the scope of this article, but wikipedia has more information.
- The OpenVPN clients/server authenticate each other with certificates signed by the a trusted Certificate Authority (CA). We will be creating a CA to do this.
- There will be a lot of “certificates” and other such cryptographic files we will need in order for this to work. These are simply just text files with unique values which are generated by OpenSSL scripts in the router command line. Some of these files should be kept secure, others can be shared insecurely.
Getting Started
I looked for many tutorials, this is the one I followed, and this guide will reference it heavily. I recommend following it directly if you want a quick and dirty step by step guide. My goal here is to understand what is happening with each step, as I found myself wondering just what in the heck I was doing. There are also a few “gotchas” which I ran into and I try to mention in this guide.
Another good guide based on VyOS can be found here, it uses an alternative method to generate keys and also talks how to configure dynamic IP services.
Create a Certificate Authority (CA)
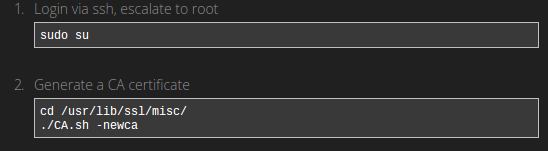 Our router comes installed with OpenSSL which contains several useful scripts in times when we need to generate cryptographic files.
CA.sh -newca generates a folder called demoCA with a bunch of files and folders in it. According to OpenSSL, these are the files needed for minimal Certificate Authority application. A certificate authority is trusted party responsible for issuing signed certificates for clients and servers. If a client and server trust the CA, then they can trust each other if they hold certificates signed by the CA.

We need to fill in a bunch of required data before generation is complete. You will see this screen several more times during this process. If you skip fields generation may fail. You may be prompted to create a password, if you skip it generation may fail. Just restart the process if it fails. If you see these files, then you succeeded:
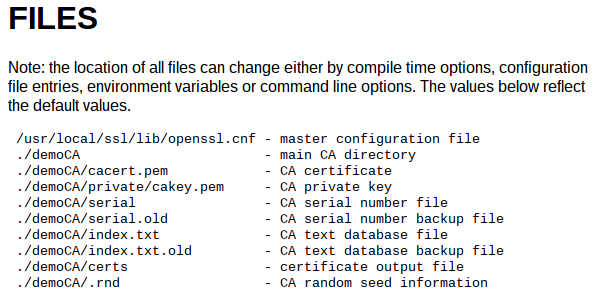
Files in the demoCa folder, taken from openssl.org docs
We only really care about cakey.pem and cacert.pem for our purposes.
cakey.pem is the private key of the CA, it is important that this is kept secret. Anyone with this key would be able to issue new certificates to connect to your VPN.
cacert.pem is the public key, publicly accessible which clients and servers eventually add to their trusted certificate authorities.
Generating VPN Server Public/Private Key

CA.sh -newreq This script will prompt you again for generating a password, information about location, names, etc. Just fill it out. The passwords don’t really matter, but you will need to remember them. Also the common name field should be unique.
There are 2 files which get generated:
newreq.pem is the unsigned public key of the server which needs to be signed by the CA.
newkey.pem is the private key of the server, this needs to be kept secret.
CA.sh -sign The servers public key gets signed by the CA making a public certificate. Now clients know that they can trust the server bearing this certificate. You may be prompted for a password during this command, use the one you created when making the CA.
The certificate is a new file: newcert.pem
Securing Server Keys and Certificates

There are 4 files we have generated so far which we need to save permanently:
demoCA/cacert.pem The public key of the CA, made during the CA creation process
demoCA/private/cakey.pem The private key of the CA, used to sign new certificates for users of the VPN.
newcert.pem The signed public key of the OpenVPN Server.
newkey.pem The private key of the server, used to encrypt communication.
All these files get moved to the /config/auth/ folder of the router, an area on the filesystem not affected by firmware upgrades.
Diffie-Helman Key Exchange

We are generating another file here, and it takes a long time to do, like maybe 10 minutes on the router. Its essentially searching for a really long prime number. Using this number and some fancy math, it allows client and server to generate unique session keys without ever transmitting the key at all. This identical secret key is used to encrypt all further communications between client and server. This key is something only client and server can deduce, even if a third party has intercepted all communication. A really good explanation on stackexchange.
Generating Client Keys
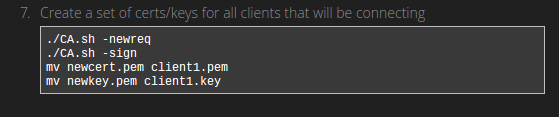
This is the same as generating the server keys, but you will do this for each client you want to have access to your VPN. Remember to save the password, and use a unique common name. We then need to move these files to the client computer, theoretically through a secure connection, as we don’t want the key file to end up in the wrong hands. Notice we are also copying the client private and public certified key as well as the cacert.pem file, which is our CA’s public key.

Summary of Generated Files

Taken from OpenVPN Docs
Nice summary provided by the OpenVPN docs to remind you which files are private, and which are public and where they need to be. The filenames don’t match exactly but hopefully you can figure it out.
We need to do one more thing, remove passwords from our server private key file. Remember when we generated keys and were asked for passwords? Well OpenVPN will complain if our server key is encrypted with a password because you aren’t able to provide it in non interactive mode. You can also remove passwords from client private key as well if you want.
openssl rsa -in /config/auth/host.key -out /config/auth/host-nopass.key

This concludes the OpenSSL portion of the walkthrough. OpenVPN and Edgerouter configuration is next.
Configuring OpenVPN Server on EdgeRouter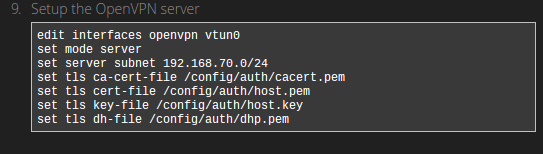
Things to consider:
- One step they neglected to mention, type “configure” before any of the above to enter the configuration program. This was not obvious to me.
- We want tls key-file to point to the /config/auth/host-nopass.key instead of the host.key, otherwise OpenVPN will throw an error on startup.
- We also need to set the port using: set local-port 443
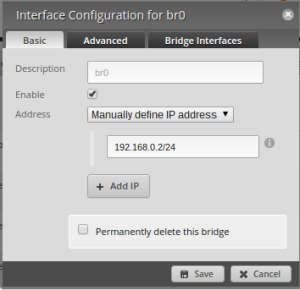
- The server subnet needs to point to a different subnet than your DHCP server, for example, my DCHP subnet is 192.168.0.0/24 and my VPN subnet is 192.168.1.0/24. I don’t know why this is, but OpenVPN will fail to start if they are the same.
This is the command line equivalent of this in the web gui “Config Tree” tab:

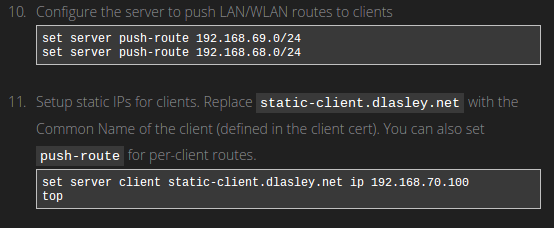
Next we want to make the rest of our lan accessible to VPN clients
Things to consider:
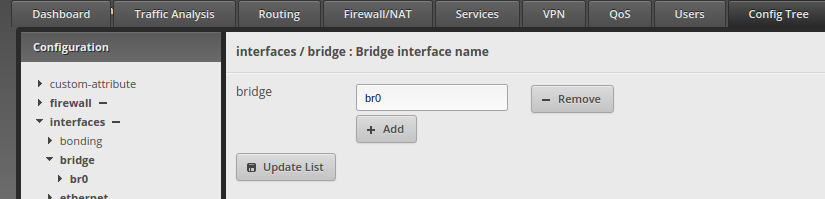
- We push routes to our LAN and WLAN interface addresses, in my case I have a bridge interface with the ip 192.168.0.2 which handles both LAN and WLAN
- We can assign static IPs to our clients on VPN by using the Common Name we entered when generating our client keys. Remember to put these static ips on the VPN subnet. I don’t think this step is strictly necessary, you can skip if you don’t care about static IPs.
 Things to consider:
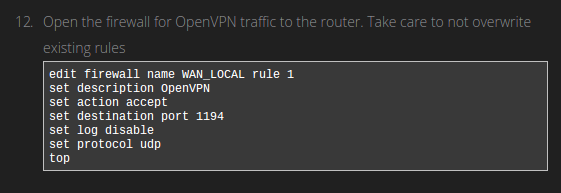
- I wanted my OpenVPN server to run on port 443, the same as HTTPS. This lowers the chance an outside network will block access. Change the port from 1194 to 443, or the port you configured for the server.
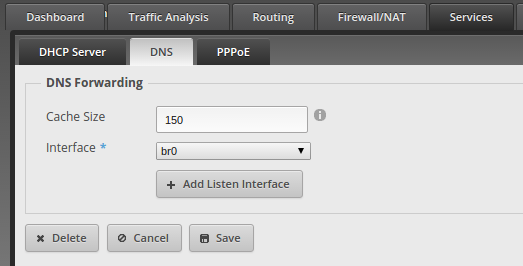
- You may also need to set this (after top command) for internet to work:
set service dns forwarding listen-on vtun0
That’s basically it for the server configuration

These commands tell the “configure” program to save and apply the changes to the system. OpenVPN should be up and running and ready to connect to from clients.
Setting Up Static External IP for your Server (Dynamic DNS)
I failed to mention that your network needs to have a static IP and/or domain address so that you know how to find it from the outside world. You can probably purchase a static IP one from your ISP, or use a dynamic dns service to map a domain to your dynamic IP. I ended up using DuckDNS, which is free dynamic dns service. You will use your IP or domain name for your client configuration. Check this tutorial in the last section to see how to use DDNS with the EdgeRouter.
Testing a Client Connection
The easiest way to test your VPN server is from another Linux computer, by following these steps.

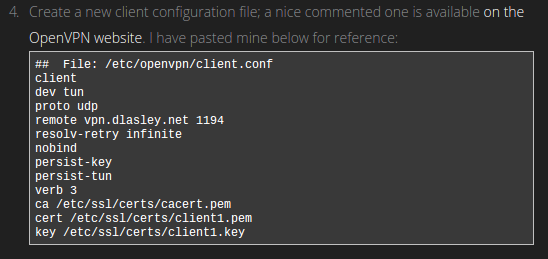
Step 4 is the real meat and potatoes of the client setup. This is what you need in the client.conf, which openvpn will use to connect to your server. You will have to adjust some things here:
- remote vpn.dlasley.net 1194 If its not obvious, replace this with your server’s external ip/domain and port. In my case the port was changed to 443.
- ca, cert, key These are the 3 files you needed to copy to the client, adjust directory and names accordingly.
If you followed these directions you should be ready to test your VPN. The tricky part now is testing from an external network. OpenVPN did not work unless I was running the client from an outside network. I tethered my laptop to my phone to test things.
Once on an outside network, connect to your VPN:
sudo openvpn client.conf
Try ifconfig, and look for the tun0 interface. If there is a local IP address assigned to it then that is a good sign. Try pinging a machine on your lan, you should get a response. Test that the internet works by visiting a website. If all that works you should be good to go. Hope this helps, and if I’ve missed anything please let me know.


