I recently got an EdgeRouter, I talk about it here
What you need to understand with the EdgeRouter and VyOs in general is that you will need to configure every aspect of the routing process. Your consumer grade router is doing a lot of things in the background you don’t realize when you plug it into your cable modem and everything just works. This makes them easy to use. The Edgerouter is a bit of a paradigm shift. You have control (even if you don’t want it) over every sub-process in the routing configuration, this gives you power, but also makes it difficult for the average user. Here are some high level concepts to understand:
- Install the latest firmware. This adds a more powerful web config interface.
- Each port on the router ( excluding console) is essentially its own isolated network card, this means they are not configured to talk to each other unless you explicitly set this up. It also means each port can basically act as their own independent router.
- There are 3 ports for a reason. The typical setup is that port 1 should be configured for your cable modem, port 2 should be configured as a DHCP server for your wired network (LAN) and port 3 should be configured for your wireless access point (WLAN). You can create a bridge between ports 2 and 3 so that they essentially act as one network.
- The VyOS is a flavor of Debian Linux. Everything you can do in the web config can be accomplished through the console or SSH into from a remote terminal by the “configure” command.
- The big feature of VyOS is that all network related configuration has been organized for you, which you can find in the “Config Tree” tab on the web client. All changes to your router configuration are reflected here.
- Ubiquity’s web interface gives you a configuration wizard and the ability to save as well as restore configurations. Many people have shared common configurations, like a basic dhcp router, you can use these things to get you up and running quicker.
So what is so complicated about routing internet to devices on the local network? Here is what I learned thanks to EdgeRouter:
- We need to configure a port, in my case eth0 to talk to your modem. It needs to obtain an external IP address to get on the internet. This is usually called the WAN (wide area network) port.
- Need the other ports, in my case eth1 and eth2 to use a DHCP server. This means they will hand out dynamic and static ip addresses to devices connected to them.
- Also would like eth1 and eth2 to allow all devices to communicate with each other on the local network regardless of which port they connect to.
- Most importantly need eth1 and eth2 to serve internet from eth0 to all devices on the network.
- While we are at it, should set up firewall rules and port forwarding if need be.
- Put my other wireless router into AP mode and connect it to the EdgeRouter.
First Steps and Quick Links
You need to connect to the router on eth1 or eth2 and get to the web interface, from here we can start configuration. Use the official documentation to get you to the web config page:
Official DHCP Walkthrough (Slightly different from this one, configures each port rather than bridging)
Forum posts with premade configs
Configuring ETH0 as a WAN Port
In the web interface dashboard shows us the physical ports. Configure eth0 like so:

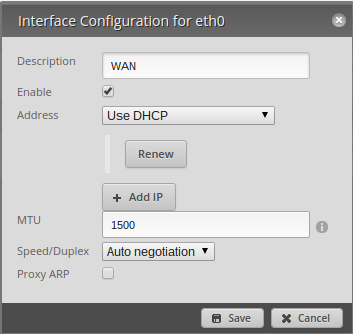
This should allow ETH0 to be assigned an IP address from your modem. I had to cycle power on cable modem and router before it picked up an IP.
Creating a Bridge between ETH1 and ETH2
This is not strictly necessary, but a bridge between these 2 ports will allow them to act identically without a separate configuration and DHCP server for each. When your bridge is made, your ETH1 and ETH2 ports will not need to be assigned an IP individually, the bridge will act like a virtual port and we will configure that instead.
In the version of the web config I used we have to add a bridge through the “config tree” tab. 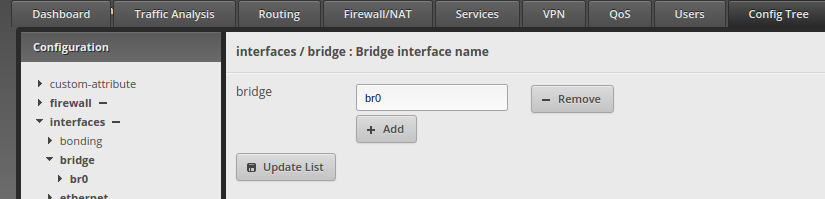 Add a bridge, I called it br0, then at the bottom hit preview and commit.
We can now go back to the dashboard and see a new interface called br0. Mine has an ip address assigned, but it won’t when you first add it.

Hit actions -> config to bring up this menu:
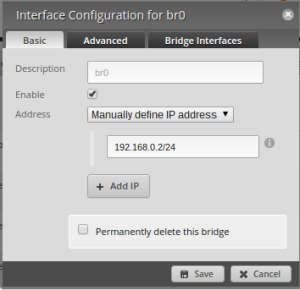
In the Basic tab, define a local IP address. This will be the new address where we will eventually access the router web page on the local network.
In the Bridge Interface tab, bridge eth1 and eth2:

Starting a DHCP Server
Right now our computer needs a static IP assigned to access the web config page. We want a DHCP server to handle assigning dynamic and static addresses. We start in the “Services” tab and add a DHCP Server.
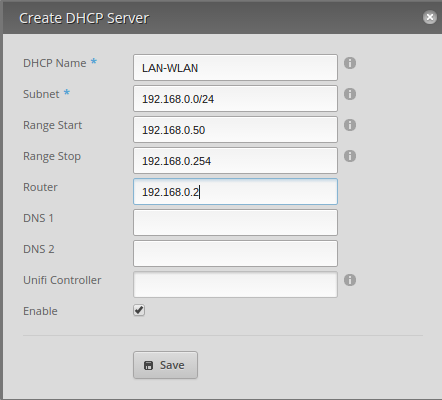
Let me explain some of these fields
- DHCP Name – arbitrary name we want this server, for administrative purposes
- Subnet – The scope of IP address which this server is responsible for watching
- Range Start – The lowest IP address that will be dynamically assigned to a device on the network
- Range Stop – The highest address which will be dynamically assigned
- Router – The IP address of interface that the server acts on, in this case it is our bridge interface.
If all went well, we should have a DHCP server and bridging running, and any devices plugged into a ETH1 or ETH2 should get assigned a dynamic IP. Internet still does not work, but that is next.
Getting Internet Working (NAT, DHCP, Forwarding)
This step will enable internet from ETH0 to devices on ETH1 and ETH2. In the “Firewall/NAT” tab, we need to enable NAT masquerading for ETH0.
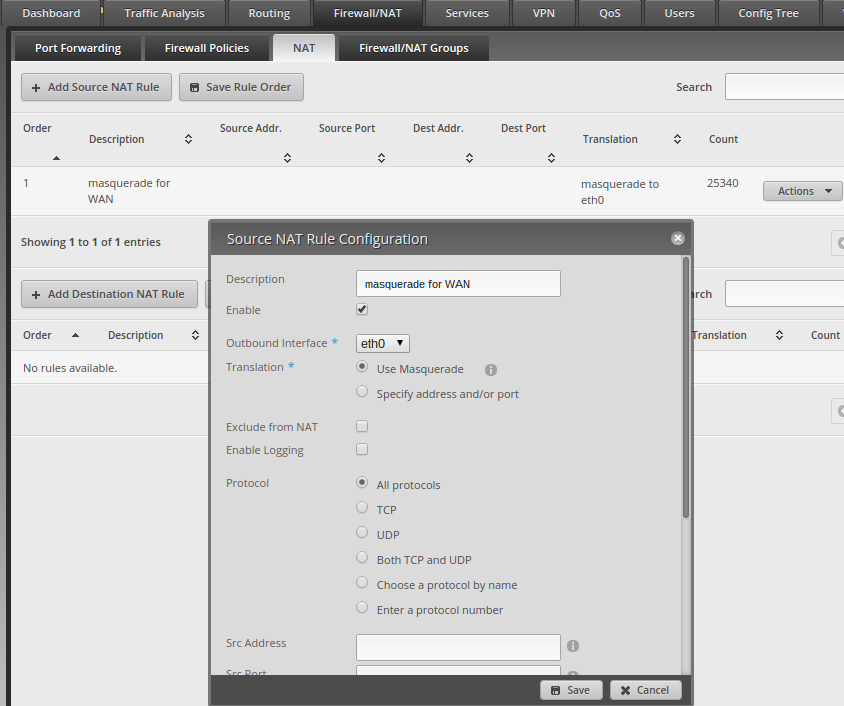
This magically allows internet to pass through ETH0 to all other interfaces on your router.
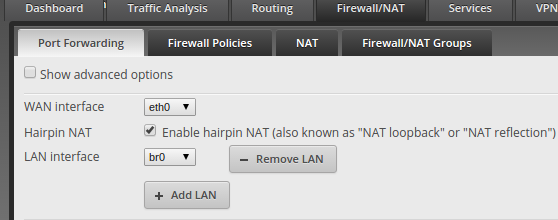
I also have some port forward rules which can be found in the Firewall/NAT Port Forward subtab:
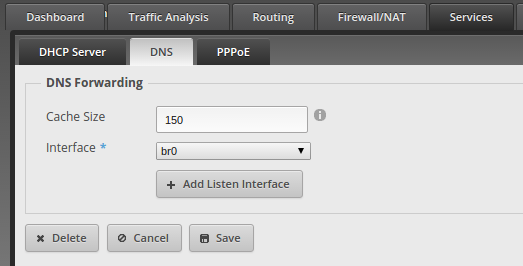
We also add a DNS rule. In the “Services” “DNS” subtab:
Finally
At this point you have the functionality of a regular DHCP router. You can see, its a bit complicated to do and you still probably want to configure the firewall. Here is a good resource for that. Connect your access point to eth1 or eth2 and connect your devices. Also try a speed test.
