Behind the Scenes at a CS:GO Gambling Site

I recently had the pleasure of working as a back-end developer for a CS:GO gambling site. These controversial sites allowed Counterstrike: Global Offensive players to trade and gamble “skins“, which are basically in game models and art.  Each skin has a rarity and real value, like old-school trading cards. The value is based on a game company called Valve who issues the skins and determines rarity and an open market of players who buy and sell them.  All the sites like ours relied on Steam; Valves online gaming platform and store. The market for these type of sites grew large under Valves hands off approach (some estimating a billion dollar industry), and dozens of gambling sites popped up, we were one of them.  Eventually there was too much negative press surrounding these sites and Valve felt it necessary to shut the sites down. We closed our site on July 19th 2016.

The Beginning

I had been contacted by a friend to help him work on the back-end for a CSGO gambling site, so I was able to get involved with the development of the site from the ground up. I personally had never heard of these types of sites and knew nothing about the market for skins. It sounded like a very interesting and challenging project.  A lot of big numbers were thrown around, so I said sure, i’ll help.

My role grew to what was eventually become the games master.  I wrote, optimized and maintained the flagship games on the site.  The CSGO gambling market was already pretty saturated at this point, with dozens of sites out, but our team was confident this would be a success. I had no idea, i just took their word for it. Our first software commit was April 3, 2016.

The Team

The entire core team was 5 people. 1 front end developer, 2 back-end developers , 1 marketing, and 1 sales.  I would consider myself sort of a minor member on the team, since I was brought in second hand, but my contributions were significant enough to warrant a small percentage of the revenues.

The front end, marketing and sales people had previous experience creating their own CS:GO gambling site. They sold it – but their back-end guys stayed with the old site.  They wanted to start a new invite-only site, this is why my friend and I were brought on. Eventually we would bring on several site administrators and moderators to help manage the community, but for the most part the team was small and everyone had their critical roles.

The Site

Our site differed from most of our competitors because we were invite only. You had to know someone who was a member to get in.  Sort of a gimmicky thing, but it seemed to work. It made us feel a little more exclusive to players and we offered rewards for members who referred their friends.

We also had many games, while most other sites focused on 1 or two. We added several experimental games as well.  We tried to be very interactive with our players, we had an email support system which allowed players to contact us with problems. We had site moderators and admins who managed the chat and reported any issues as well. We did weekly surveys to get feedback about the site for improvement. I think many of these gambling sites get a bad rap for being scammy, but the “culture” of our team was to do what we could to resolve players issues and take feedback to improve the site for them.

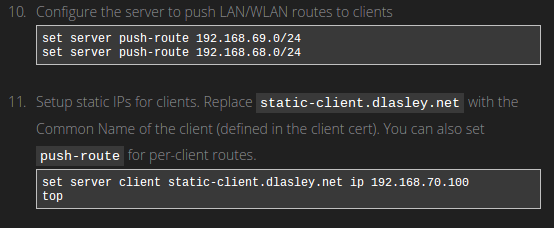
Most of our popular games were copies of what was already out there.  We launched with 2 games, one we called “Bust”, a clone of BustaBit – originally a bitcoin based gambling game.  The other was a simple coinflip game which pit two players against each other and tossed a coin to select a winner. We would eventually add on several more “classic” games including trivia, roulette and jackpot and made them provably fair when it was applicable.

The Tech

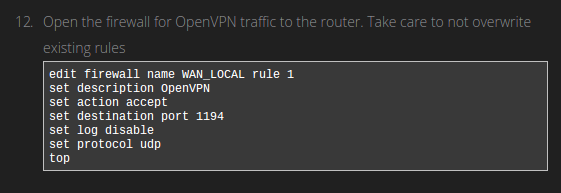
The front end was written in Angular, the back-end was written in Node.  I had several years of experience in Node development prior to this and front end experience with Angular and React, so I was actually the most experienced developer on the project, though the team was extremely capable. We used RethinkDB as our back-end store, and Redis for caching. SocketIO was used for all real-time client updates. I wasn’t responsible for deployment, but we used Google Cloud (Like Amazon Web Services) with Kubernetes and Docker containers. We were basically ready to scale in an instant. We could deploy new pods, update existing pods, and scale out without ever causing a disruption to the site, it was really cool.

The Business

Whats interesting about sites like these is that you never actually deal with “real money”. It still works like an online casino, you offer games and you take a rake, but players don’t deposit money, they deposit virtual items: “skins”. They get compensated with an in game currency based on the current market value of the skin, and they use this to play games.

We kept track of the current value of each type of skin so we could value our entire inventory.  We used several third-party skin trading sites for price data.  We also kept track of the amount of in game currency on all users accounts. Our profit was the difference of these numbers.

Every so often our sales guy would take skins from inventory, equivalent to our current profit, and sell them in bulk to a reseller at a discount of 50-70%. The reseller would buy the skins with Bitcoin. Our sales guy would then pay the team in Bitcoin. That was the whole business.

So what were the numbers? Once our site was peaking around 1000 concurrent players every day (about 2.5 months after launch), i’d estimate we would rake from the games about 10-20k per day.  There were other daily costs, giveaways, bonuses, trivia prizes, advertising, exploits etc. There were the cost of running servers, and the discount and depreciation we took when selling skins. So after all of that take home profit was maybe half of that, 5-10k per day which is still amazing for a team of 5.  We didn’t have much time to enjoy that though, as we shut down the site about a week after reaching those numbers.

The Challenges

Launch

We launched in my opinion, before we were ready (according to startup philosophy, that’s what you should do).  We had about a month+ of development then a 1 week long alpha, and a few days of beta. The marketing team was ready with a couple hundred people to use the site when we launched. Right off the bat we had issues with the trading system and with the games, but releasing like that helped us identify problems right away. We realized we needed a support system, so that got introduced early on. We cruised along with a hundred or so people for a week or two, and got a big bump up to 500 at some point, then hit our next stumbling block.

Scaling Games

Our flagship game,  Bust, was really laggy once the active players started hitting around 500.  Its a game that requires very responsive controls since it is a time critical game. We were doing a lot of database calls and Redis calls to make sure game state was synchronized across servers.  Eventually had to refactor the game to run all in memory through Redis. This was the first refactor which allowed us to handle 500+ players, but we would need to revisit performance again eventually.

Hack Attack

Shortly after release, we were hacked. We never really figured out how they did it, but we had some ideas. The hacker was able to login as an admin and send in game money to players.  The direct way to login as an admin was to login through Steam, which was a 2 factor authentication system on a commercial site. Probably not possible. The only other way we could think of is if the hacker somehow got a hold of the session data of an admin.  We didn’t know which admin, because we weren’t logging any of that data.  So we undid all the unauthorized transactions, added logging to those routes and added https to encrypt data to and from the server.  We didn’t have that problem again.

Market Manipulations

This was actually an on-going problem we never fully resolved. Our site allowed users to trade in their skins, and we would compensate them with an in game currency equal to what those skins were valued at on the market. The problem is the market can be low volume and extremely volatile. Prices could fluctuate or be delayed, and a single player could manipulate the prices of the market.  The markets that we used to price our items were third party sites. Errors in their price API’s could also be issues for us.  If there was a mis-priced  item, we could be sure users would find it and exploit it.  Over the course of our site being up we probably lost several thousands of dollars just to people making smart trades ( or actively manipulating prices), depositing over valued items to us while withdrawing undervalued items. We added a withdraw “tax” among other rules to help prevent losses, but we never in my mind found a bullet proof solution.

Scaling Games Again

It was a big achievement when we hit 1000 players. That was kind of a big goal from the beginning. We were still a new site at about maybe 2 months in, but now we were sort of medium sized.  The problem was that Bust could not handle the load, the back-end and front end were becoming unresponsive with the amount of players playing. It was critical the game be lag free.  We had to visit the front end code and do some optimizations, while the back-end needed a different approach. I eventually redid the entire architecture of the game which allowed it to scale well past 1000 players and also simplify the game logic greatly. For the most part this new architecture gave us a pattern for easily adding new games scalably and we never had issues with performance after that.

Hacked Again

About 3 months after launch Valve made a big announcement denouncing gambling sites. Shortly after that we experienced another hack attack. It was sort of a one-two punch to our morale, and again, we never really figured how it happened.  The hackers struck twice in succession, making off with some 20k worth of skins.  Its hard to know exactly how much, but it was significant.

The hackers somehow got direct access to our Steam bots. Each bot is basically a regular Steam account which were used to store skins for users, but they were automated, so we could use them to send and receive trade requests programatically. Getting access to the bots would be the same as getting access to someones Steam account, nearly impossible. Somehow they had logins, passwords and 2-factor authentication capability for several bots.  There were some strange things the hackers did leading up to the attack, so its uncertain if this was an exploit, a security lapse on our part, or an inside job.   I don’t really know enough details, so I won’t speculate further.

Shut Down

The last hack attack caused our site to disable all our bots while we changed our custom bot handling code to use steamtrad.es, a third party skin inventory management site. This was all moot as a week later Valve issued a cease and desist to sites like ours.  The reaction most of us had was sort of a silent acceptance, not too much was said. I think we all knew it would happen eventually, but it was still pretty sad.

We kept our withdraw system open for a week so users could cash out, but we disabled all games and eventually shut the site down completely.

The End

We all worked really hard on this project, and ironically from the beginning I knew it was a gamble and didn’t expect the ride to last very long.  I’m amazed we were able to become as successful as we did and in such a short time, and I’m really proud of all our work on the site. I appreciate the opportunity to have been brought on to a project like this, and the guys I worked with were really great and dedicated.  I’m also thankful to all the players who trusted us with their time and money and hope they had a good time while it lasted.

With anything like this where you really put your blood and sweat into, it is disappointing to have it end so abruptly, but hopefully there will be more projects to work on.

I might eventually do a more technical article on the system architecture of the site, so stay tuned.

OpenVPN on Ubiquiti EdgeRouter

A Virtual Private Network (VPN) allows a remote machine through an encrypted connection to connect to a local area network as if it was a local machine. It’s useful when traveling and you need access to a computer on a lan behind a firewall for whatever reason. Typically you’d use this to securely access your work network from the outside, but you can create the same functionality on your home network.  It’s also useful when away on a connection which is blocking ports, blocking websites, or monitoring your traffic. You can connect to your home VPN through a single encrypted port and use the internet as if you were in the privacy of your own home.

There are several protocols for making a VPN. Here is a good overview of PPTP, IPSEC and OpenVPN. I chose OpenVPN because it can run on any port, and seems to be the most recommended. I configured my server to run on port 443, the same port as HTTPS.  This makes fairly sure you can always access your home VPN from any other network as they most likely will not restrict HTTPS access. Warning though, OpenVPN is probably the most difficult to set up out of all the options.

EdgeRouter and OpenVPN

Here I talk about the EdgeRouter Lite

Steps for turning EdgeRouter into a DHCP Router 

Even though the EdgeRouter has the capability to run OpenVPN server, its completely absent from the web config. Most of it has to be done through the command line. It was also difficult to find good guides on how to set it up, there are many steps and concepts which can be confusing.  Searching for OpenVPN on Vyos or Vyatta helped to find additional resources.

OpenVPN Concepts

  • There are servers and there are clients, we want our router to act as an OpenVPN server and any remote computers to have client access. Technically though clients can be servers and vice versa, but we won’t get into that.
  • OpenVPN can run in several modes to authenticate clients and servers, making a confusing process even more difficult. Wikipedia has a concise summary of the available methods.  We will be configuring the Public Key Infrastructure based solution, which also happens to be the most complex option.
  • We will be using OpenSSL encryption tools for public/private key and certificate generation. Public key encryption details are beyond this the scope of this article, but wikipedia has more information.
  • The OpenVPN clients/server authenticate each other with certificates signed by the a trusted Certificate Authority (CA). We will be creating a CA to do this.
  • There will be a lot of “certificates” and other such cryptographic files we will need in order for this to work. These are simply just text files with unique values which are generated by OpenSSL scripts in the router command line. Some of these files should be kept secure, others can be shared insecurely.

Getting Started

I looked for many tutorials, this is the one I followed, and this guide will reference it heavily. I recommend following it directly if you want a quick and dirty step by step guide. My goal here is to understand what is happening with each step, as I found myself wondering just what in the heck I was doing. There are also a few “gotchas” which I ran into and I try to mention in this guide.

Another good guide based on VyOS can be found here, it uses an alternative method to generate keys and also talks how to configure dynamic IP services.

 Create a Certificate Authority (CA)

generate-ca
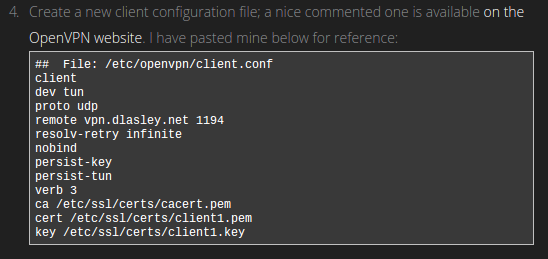
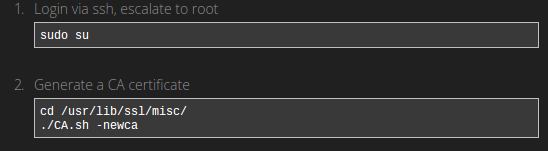
Our router comes installed with OpenSSL which contains several useful scripts in times when we need to generate cryptographic files.

CA.sh -newca generates a folder called demoCA with a bunch of files and folders in it. According to OpenSSL, these are the files needed for minimal Certificate Authority application. A certificate authority is trusted party responsible for issuing signed certificates for clients and servers.  If a client and server trust the CA, then they can trust each other if they hold certificates signed by the CA.

answer-ca

We need to fill in a bunch of required data before generation is complete. You will see this screen several more times during this process. If you skip fields generation may fail. You may be prompted to create a password, if you skip it generation may fail. Just restart the process if it fails. If you see these files, then you succeeded:

democa-files

Files in the demoCa folder, taken from openssl.org docs

We only really care about cakey.pem and cacert.pem for our purposes.

cakey.pem is the private key of the CA, it is important that this is kept secret. Anyone with this key would be able to issue new certificates to connect to your VPN.

cacert.pem is the public key, publicly accessible which clients and servers eventually add to their trusted certificate authorities.

Generating VPN Server Public/Private Key

generate-server-cert

CA.sh -newreq This script will prompt you again for generating a password, information about location, names, etc. Just fill it out. The passwords don’t really matter, but you will need to remember them.  Also the common name field should be unique.

There are 2 files which get generated:

newreq.pem is the unsigned public key of the server which needs to be signed by the CA.

newkey.pem is the private key of the server, this needs to be kept secret.

CA.sh -sign  The servers public key gets signed by the CA making a public certificate. Now clients know that they can trust the server bearing this certificate. You may be prompted for a password during this command, use the one you created when making the CA.

The certificate is a new file: newcert.pem

Securing Server Keys and Certificates

move-keys

There are 4 files we have generated so far which we need to save permanently:

demoCA/cacert.pem The public key of the CA, made during the CA creation process

demoCA/private/cakey.pem The private key of the CA, used to sign new certificates for users of the VPN.

newcert.pem The signed public key of the OpenVPN Server.

newkey.pem The private key of the server, used to encrypt communication.

All these files get moved to the /config/auth/ folder of the router, an area on the filesystem not affected by firmware upgrades.

Diffie-Helman Key Exchange

dfh

We are generating another file here, and it takes a long time to do, like maybe 10 minutes on the router. Its essentially searching for a really long prime number. Using this number and some fancy math, it allows client and server to generate unique session keys without ever transmitting the key at all.  This identical secret key is used to encrypt all further communications between client and server. This key is something only client and server can deduce, even if a third party has intercepted all communication.  A really good explanation on stackexchange.

Generating Client Keys

clientkeys

This is the same as generating the server keys, but you will do this for each client you want to have access to your VPN.  Remember to save the password, and use a unique common name.  We then need to move these files to the client computer, theoretically through a secure connection, as we don’t want the key file to end up in the wrong hands. Notice we are also copying the client private and public certified key as well as the cacert.pem file, which is our CA’s public key.

movingclientkeys

Summary of Generated Files

keyfileexplanationtable

Taken from OpenVPN Docs

Nice summary provided by the OpenVPN docs to remind you which files are private, and which are public and where they need to be. The filenames don’t match exactly but hopefully you can figure it out.

We need to do one more thing, remove passwords from our server private key file. Remember when we generated keys and were asked for passwords? Well OpenVPN will complain if our server key is encrypted with a password because you aren’t able to provide it in non interactive mode. You can also remove passwords from client private key as well if you want.

openssl rsa -in /config/auth/host.key -out /config/auth/host-nopass.key

removingpasswords

This concludes the OpenSSL portion of the walkthrough. OpenVPN and Edgerouter configuration is next.


Configuring OpenVPN Server on EdgeRouteropenvpn-edgerouter1

Things to consider:

  • One step they neglected to mention, type “configure” before any of the above to enter the configuration program. This was not obvious to me.
  • We want tls key-file to point to the /config/auth/host-nopass.key instead of the host.key, otherwise OpenVPN will throw an error on startup.
  • We also need to set the port using: set local-port 443 
  • The server subnet needs to point to a different subnet than your DHCP server, for example, my DCHP subnet is 192.168.0.0/24 and my VPN subnet is 192.168.1.0/24. I don’t know why this is, but OpenVPN will fail to start if they are the same.

This is the command line equivalent of this in the web gui “Config Tree” tab:

tls-config-tree

Next we want to make the rest of our lan accessible to VPN clients

vpn-pushroute

Things to consider:

  • We push routes to our LAN and WLAN interface addresses, in my case I have a bridge interface with the ip 192.168.0.2 which handles both LAN and WLAN
  • We can assign static IPs to our clients on VPN by using the Common Name we entered when generating our client keys. Remember to put these static ips on the VPN subnet.  I don’t think this step is strictly necessary, you can skip if you don’t care about static IPs.

vpn-firewallThings to consider:

  • I wanted my OpenVPN server to run on port 443, the same as HTTPS. This lowers the chance an outside network will block access. Change the port from 1194 to 443, or the port you configured for the server.
  • You may also need to set this (after top command) for internet to work:

set service dns forwarding listen-on vtun0

That’s basically it for the server configuration

savecommit

These commands tell the “configure” program to save and apply the changes to the system.  OpenVPN should be up and running and ready to connect to from clients.


Setting Up Static External IP for your Server (Dynamic DNS)

I failed to mention that your network needs to have a static IP and/or domain address so that you know how to find it from the outside world. You can probably purchase a static IP one from your ISP, or use a dynamic dns service to map a domain to your dynamic IP. I ended up using DuckDNS, which is free dynamic dns service.  You will use your IP or domain name for your client configuration.  Check this tutorial in the last section to see how to use DDNS with the EdgeRouter.


Testing a Client Connection

The easiest way to test your VPN server is from another Linux computer, by following these steps.

client-config

Step 4 is the real meat and potatoes of the client setup. This is what you need in the client.conf, which openvpn will use to connect to your server. You will have to adjust some things here:

  • remote vpn.dlasley.net 1194 If its not obvious, replace this with your server’s external ip/domain and port. In my case the port was changed to 443.
  • ca, cert, key These are the 3 files you needed to copy to the client, adjust directory and names accordingly.

If you followed these directions you should be ready to test your VPN. The tricky part now is testing from an external network. OpenVPN did not work unless I was running the client from an outside network. I tethered my laptop to my phone to test things.

Once on an outside network, connect to your VPN:

sudo openvpn client.conf

Try ifconfig, and look for the tun0 interface. If there is a local IP address assigned to it then that is a good sign. Try pinging a machine on your lan, you should get a response. Test that the internet works by visiting a website. If all that works you should be good to go. Hope this helps, and if I’ve missed anything please let me know. 

Configuring an Ubiquity EdgeRouter as a plain old DHCP Router

I recently got an EdgeRouter, I talk about it here

What you need to understand with the EdgeRouter and VyOs in general is that you will need to configure every aspect of the routing process. Your consumer grade router is doing a lot of things in the background you don’t realize when you plug it into your cable modem and everything just works. This makes them easy to use.  The Edgerouter is a bit of a paradigm shift.  You have control (even if you don’t want it) over every sub-process in the routing configuration, this gives you power, but also makes it difficult for the average user. Here are some high level concepts to understand:

  • Install the latest firmware. This adds a more powerful web config interface.
  • Each port on the router ( excluding console) is essentially its own isolated network card, this means they are not configured to talk to each other unless you explicitly set this up. It also means each port can basically act as their own independent router.
  • There are 3 ports for a reason. The typical setup is that port 1 should be configured for your cable modem, port 2 should be configured as a DHCP server for your wired network (LAN) and port 3 should be configured for your wireless access point (WLAN). You can create a bridge between ports 2 and 3 so that they essentially act as one network.
  • The VyOS is a flavor of Debian Linux. Everything you can do in the web config can be accomplished through the console or SSH into from a remote terminal by the “configure” command.
  • The big feature of VyOS is that all network related configuration has been organized for you, which you can find in the “Config Tree” tab on the web client. All changes to your router configuration are reflected here.
  • Ubiquity’s web interface gives you a configuration wizard and the ability to save as well as restore configurations. Many people have shared common configurations, like a basic dhcp router, you can use these things to get you up and running quicker.

So what is so complicated about routing internet to devices on the local network? Here is what I learned thanks to EdgeRouter:

  • We need to configure a port, in my case eth0 to talk to your modem. It needs to obtain an external IP address to get on the internet. This is usually called the WAN (wide area network) port.
  • Need the other ports, in my case eth1 and eth2 to use a DHCP server. This means they will hand out dynamic and static ip addresses to devices connected to them.
  • Also would like eth1 and eth2 to allow all devices to communicate with each other on the local network regardless of which port they connect to.
  • Most importantly need eth1 and eth2 to serve internet from eth0 to all devices on the network.
  • While we are at it, should set up firewall rules and port forwarding if need be.
  • Put my other wireless router into AP mode and connect it to the EdgeRouter.

First Steps and Quick Links

You need to connect to the router on eth1 or eth2 and get to the web interface, from here we can start configuration. Use the official documentation to get you to the web config page:

Quick Start Guide

Official DHCP Walkthrough (Slightly different from this one, configures each port rather than bridging)

The Latest firmware

Forum posts with premade configs

Configuring ETH0 as a WAN Port

In the web interface dashboard shows us the physical ports. Configure eth0 like so:

configport

wanconfig

This should allow ETH0 to be assigned an IP address from your modem. I had to cycle power on cable modem and router before it picked up an IP.

Creating a Bridge between ETH1 and ETH2

This is not strictly necessary, but a bridge between these 2 ports will allow them to act identically without a separate configuration and DHCP server for each. When your bridge is made, your ETH1 and ETH2 ports will not need to be assigned an IP individually, the bridge will act like a virtual port and we will configure that instead.

In the version of the web config I used we have to add a bridge through the “config tree” tab. creatingbridgeAdd a bridge, I called it br0, then at the bottom hit preview and commit.

We can now go back to the dashboard and see a new interface called br0. Mine has an ip address assigned, but it won’t when you first add it.

dashboard-br0

Hit actions -> config to bring up this menu:

br0-config-basic

In the Basic tab, define a local IP address. This will be the new address where we will eventually access the router web page on the local network.

In the Bridge Interface tab, bridge eth1 and eth2:

br0-config-bridgeinterfaces

Starting a DHCP Server

Right now our computer needs a static IP assigned to access the web config page. We want a DHCP server to handle assigning dynamic and static addresses. We start in the “Services” tab and add a DHCP Server.

dhcpserver

Let me explain some of these fields

  • DHCP Name – arbitrary name we want this server, for administrative purposes
  • Subnet – The scope of IP address which this server is responsible for watching
  • Range Start – The lowest IP address that will be dynamically assigned to a device on the network
  • Range Stop – The highest address which will be dynamically assigned
  • Router – The IP address of interface that the server acts on, in this case it is our bridge interface.

If all went well, we should have a DHCP server and bridging running, and any devices plugged into a ETH1 or ETH2 should get assigned a dynamic IP. Internet still does not work, but that is next.

Getting Internet Working (NAT, DHCP, Forwarding)

This step will enable internet from ETH0 to devices on ETH1 and ETH2. In the “Firewall/NAT” tab, we need to enable NAT masquerading for ETH0.

natmasquerade

This magically allows internet to pass through ETH0 to all other interfaces on your router.

I also have some port forward rules which can be found in the Firewall/NAT Port Forward subtab:

forwarding

We also add a DNS rule.  In the “Services”  “DNS” subtab:

dns

Finally

At this point you have the functionality of a regular DHCP router.  You can see, its a bit complicated to do and you still probably want to configure the firewall. Here is a good resource for that. Connect your access point to eth1 or eth2 and connect your devices. Also try a speed test.

Thoughts on Ubiquity EdgeRouter

Recently purchased an Ubiquity EdgeRouter Lite, a fast wired router which runs Linux. It was a bit of an impulse buy, but a friend of mine convinced me it would be worth it, and it is pretty cheap. The router runs a proprietary version of Debian Linux maintained by Ubiquity called EdgeOS. It has a close open source cousin called VyOS.

My old router, an Asus RT-N66 was no slouch, but I wasn’t able to get full download speeds at home. I thought it was my service, but it was actually my router not able to handle those speeds. I pay for 150mb down, but was only able to get about 100mb with the Asus, with the EdgeRouter I get full 150mb down on my wired computers. The cost of the EdgeRouter Lite? Only 90$.

asusrouter

Before Speed using Asus Router

edgerouter

After Speed using EdgeRouter lite

The EdgeRouter’s drawback is that it requires IT level skills to configure. Even though they provide a web interface, it requires a lot of googling to figure out how just set up a dhcp router, something you can do with a few clicks on the Asus. I consider myself pretty tech saavy, but it took me several hours to figure that out, and several days more to get an OpenVPN server running. Overall its nice to have such a powerful and fast router on the network, it works very well despite the steep learning curve.